Quick Answer The HPE ProLiant DL160 Gen10 supports hot-plug SFF SAS/SATA drives in an 8-bay or optional 4-bay configuration. Identify the failed drive using the amber fault LED on the drive carrier or via HPE iLO / Smart Storage Administrator. Pull the failed carrier, swap the drive, reseat, and allow RAID to rebuild automatically if configured. If your server is out of warranty, third-party maintenance providers can supply certified replacement drives and on-site support for significantly less than OEM rates.
Why Hard Drives Fail in the DL160 G10
The HPE ProLiant DL160 Gen10 is a cost-optimized 1U rack server commonly deployed in virtualization, database, and general workload environments. Like any server in production, its SAS or SATA drives are subject to wear over time.
Hard drive failures on the DL160 G10 typically show up in one of three ways: the amber drive fault LED illuminates on the front panel, HPE iLO 5 logs a predictive failure alert, or the operating system reports a disk offline event. In RAID configurations, you will often see a degraded array warning before full failure.
The good news: the DL160 G10 uses hot-plug drive bays, so in most configurations you can replace a failed drive without powering down the server.
What You Need Before You Start
| Item | Details |
|---|---|
| Replacement drive | Match the interface (SAS or SATA), form factor (SFF 2.5"), capacity, and speed. HPE-branded drives include SmartDrive firmware, but compatible third-party drives work in most configurations. |
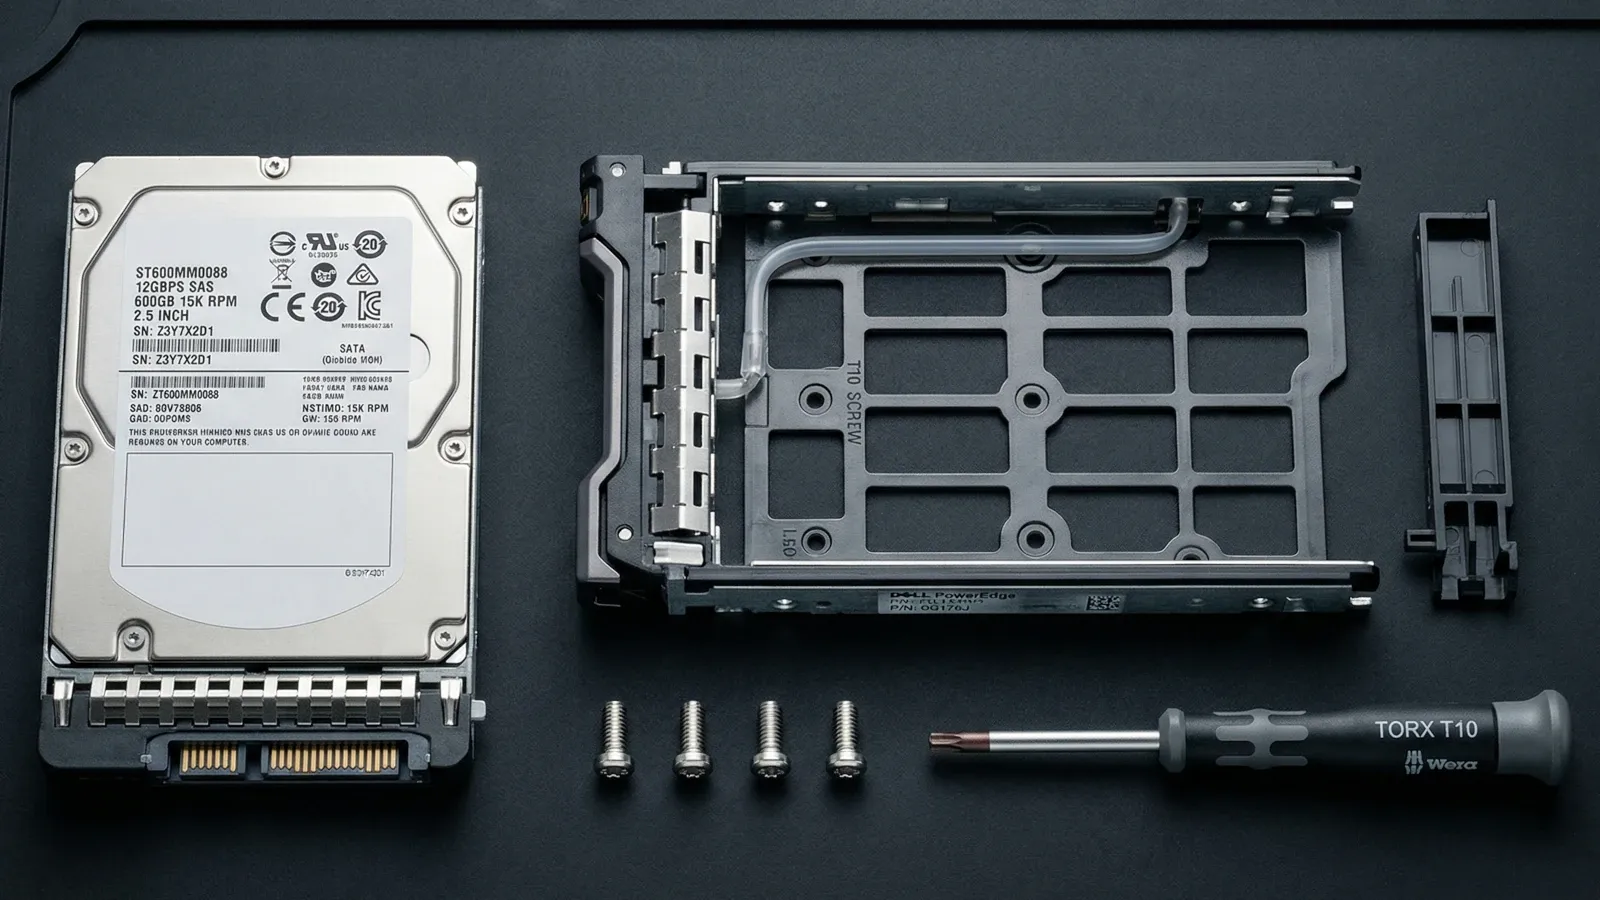
| Drive carrier (tray) | HPE DL160 G10 uses SFF drive carriers. The failed drive's carrier can often be reused, but confirm it is undamaged. |
| T10 Torx screwdriver | Required to transfer the drive from the old carrier to the new drive if reusing the tray. |
| ESD wrist strap | Recommended when handling bare drives outside the carrier. |
| Access to HPE iLO 5 or SSA | Needed to confirm drive status before and after replacement. |
Before you order: Confirm whether your DL160 G10 is running HPE's Smart Array controller or the embedded S100i software RAID. The storage controller affects which drives are fully supported and how RAID rebuild is triggered.
Step 1: Identify the Failed Drive
Do not guess which drive has failed. Always confirm the exact bay location before pulling any drive, especially in a RAID array where removing the wrong disk could cause data loss.
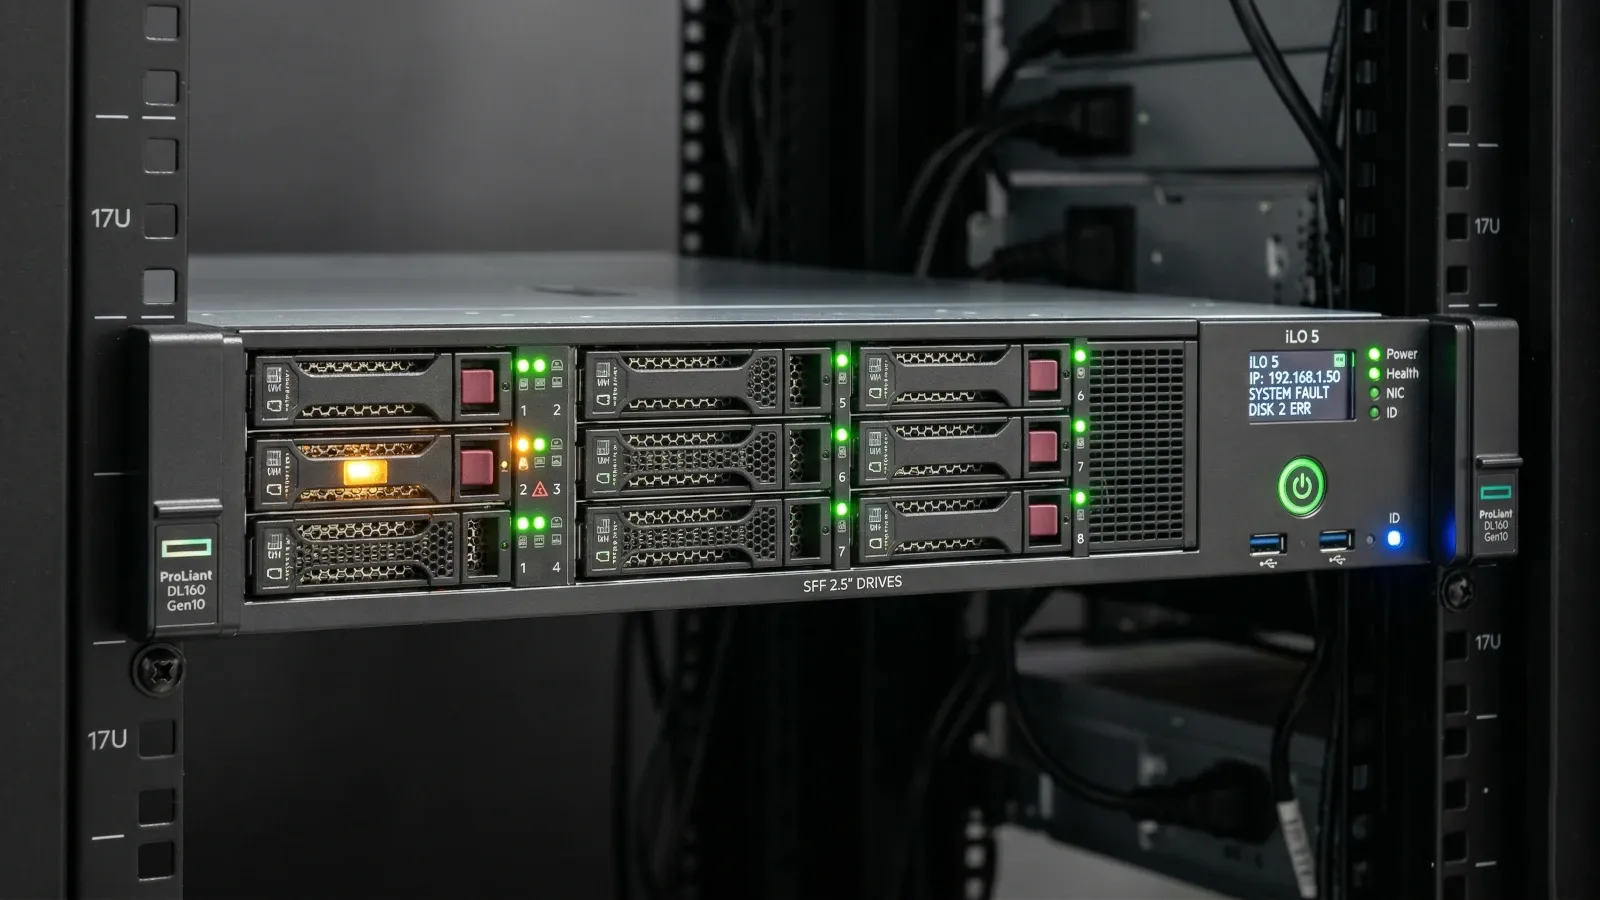
- Check the physical drive LEDs. On the DL160 G10 front panel, each drive bay has two LEDs. A solid or blinking amber LED indicates a fault condition. A green LED indicates normal activity. If the amber LED is lit on a specific bay, that is your failed drive.
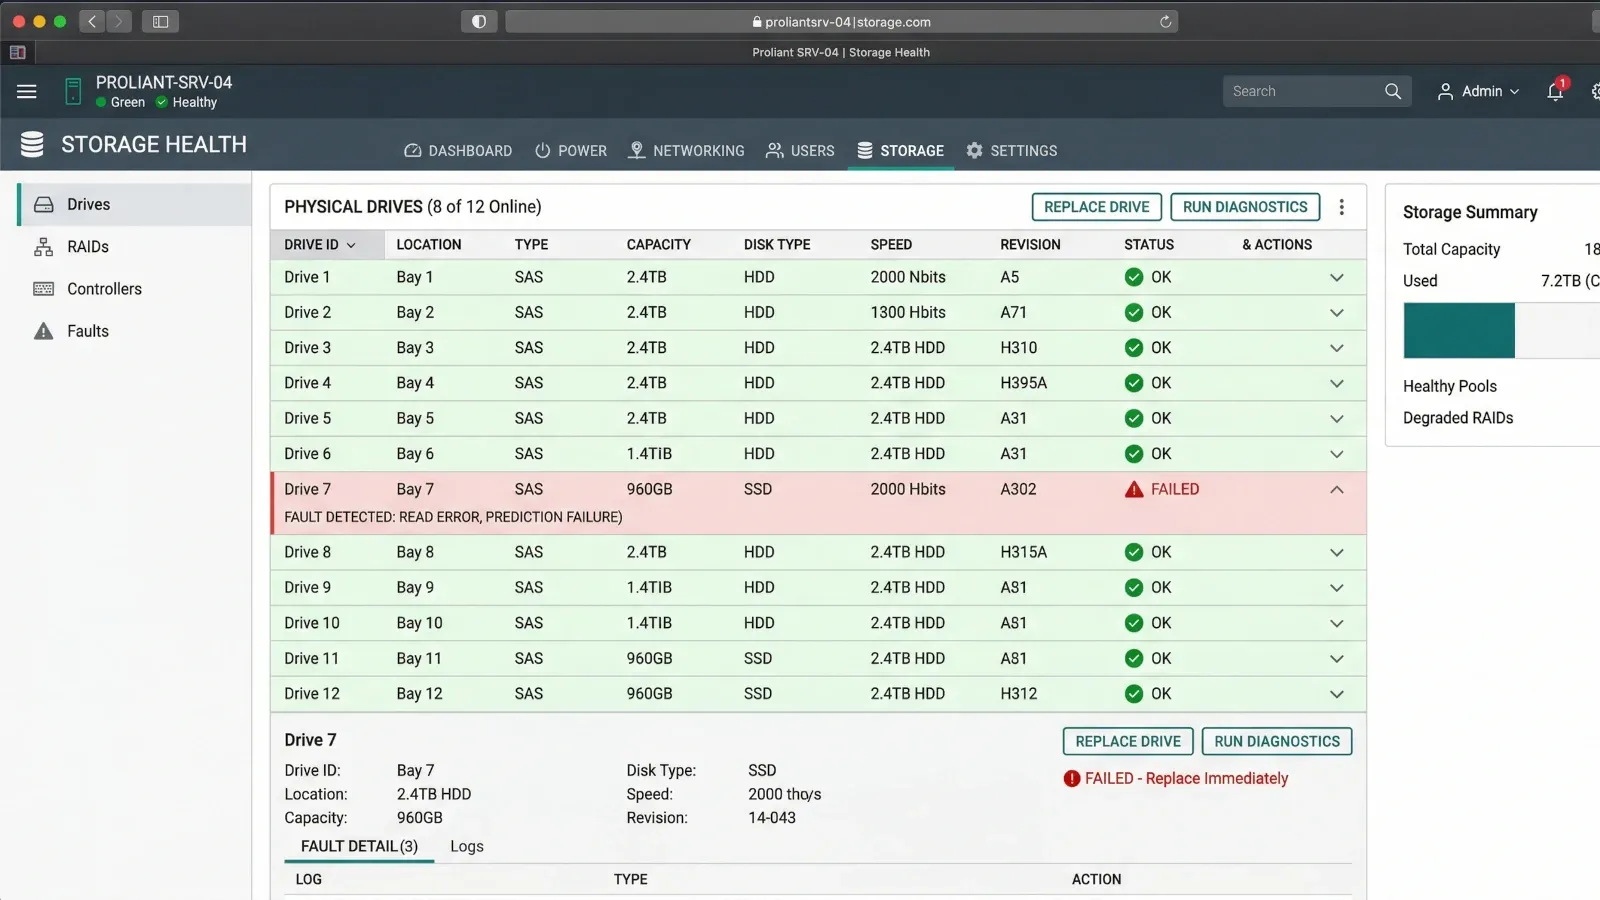
- Confirm in HPE iLO 5. Log into the iLO 5 web interface. Navigate to Storage > Smart Storage. Look for any drives showing a status of Failed, Predictive Failure, or Missing. The bay number displayed maps directly to the physical bay on the front of the server.
- Check HPE Smart Storage Administrator (SSA). If you have OS access, launch SSA (formerly ACU). It will display the physical drive map and flag the faulted disk by bay slot. If the RAID array is degraded, SSA will indicate how many drives are missing from the array.
Tip: Write down the bay slot number before touching anything. On the DL160 G10, bays are numbered left to right starting at bay 1. Double-checking this prevents accidentally pulling a healthy drive from a degraded RAID set, which would cause the array to fail completely.
Sourcing the Right Replacement Drive
The DL160 Gen10 supports the following drive types depending on configuration:
- SFF SAS 12G — Most common in enterprise configurations. Speeds of 10K or 15K RPM.
- SFF SATA 6G — Used in cost-optimized builds, including 7.2K RPM nearline drives.
- SFF SSD SATA or SAS — Available in higher-performance configurations.
HPE-branded SmartDrive options include unique firmware that enables features like predictive failure alerts through iLO. However, certified third-party drives from reputable suppliers will function normally in the DL160 G10 in most deployment scenarios. Some non-HPE drives may display a non-supported drive alert in iLO, but this is typically informational and does not prevent the drive from operating.
If you are under an active OEM support contract, verify replacement drive sourcing requirements before purchasing from a third party. If your server is out of warranty, sourcing from an independent provider can reduce your replacement cost significantly.
How to Remove the Failed Drive
- Prepare the server. The DL160 G10 supports hot-plug drive replacement in most configurations. If your system was configured with non-hot-plug drives, power down the server and disconnect power before proceeding.
- Locate the failed bay. Confirm the amber LED is lit on the correct bay. Do a final check against the bay number you recorded from iLO or SSA.
- Release the drive carrier latch. Press the release button on the drive carrier. The latch will swing open. Grip the latch handle and slide the drive carrier straight out of the bay. Set it on an ESD-safe surface.
- Remove the drive from the carrier. Using a T10 Torx screwdriver, remove the four carrier mounting screws (two per side). Slide the drive out of the carrier. Set the failed drive aside. If you are reusing the carrier, inspect it for damage before proceeding.
How to Install the Replacement Drive
- Mount the new drive in the carrier. Slide the replacement drive into the carrier in the same orientation as the original. Align the screw holes on the drive with the carrier slots. Secure with the four T10 Torx screws. Do not overtighten.
- Insert the drive carrier into the bay. With the latch open, align the carrier with the guide rails in the drive bay. Slide the carrier in firmly until it is fully seated. Close the latch until it clicks into place. The drive activity LED should come on within a few seconds.
- Confirm drive detection in iLO or SSA. Return to iLO 5 or SSA. The new drive should appear as OK or Ready. If the drive was part of a RAID array, the controller will begin rebuilding the array automatically (on Smart Array controllers). This process can take anywhere from 30 minutes to several hours depending on drive capacity and server load.
- Monitor the RAID rebuild. Do not power off the server during the rebuild process. In SSA or iLO, monitor rebuild progress under the logical drive or array status. Once the rebuild completes, the array status will return to OK or Optimal.
Important: If the server has no RAID configuration and the failed drive was a standalone boot or data disk, you will need to restore from backup after installing the replacement drive. RAID rebuild only applies to redundant array configurations.
Verifying the Repair
After the RAID rebuild completes, or after restoring data on a non-RAID system, perform the following checks:
- Confirm all drive LEDs are solid green and no amber faults are present.
- Verify the array status in SSA or iLO shows OK with all members present.
- Check the iLO System Event Log (IML) and confirm no new storage errors are logged.
- Run a quick health check from the OS to confirm the volume is accessible and data is intact.
What to Do If You're Out of Warranty
Many DL160 G10 servers still in production are past their HPE warranty or ProLiant support end date. At that point, OEM support contracts for replacement parts and on-site engineers become expensive and sometimes unavailable entirely.
Third-party maintenance (TPM) providers offer an alternative. A TPM provider can cover break-fix support for your DL160 G10 at a fraction of OEM cost, typically 40 to 70% less. This includes parts like hard drives, memory, and power supplies, plus certified engineers who can perform on-site replacements when needed.
TPM support for end-of-life hardware is especially useful when you are running the DL160 G10 through a cloud migration period. Rather than paying full OEM rates to maintain aging servers for 12 to 18 more months, you can shift to flexible, short-term coverage that matches your actual migration timeline.
Frequently Asked Questions
Can I use a non-HPE hard drive in a ProLiant DL160 G10?
Yes. Third-party SAS or SATA drives will function in the DL160 G10. You may see an informational alert in iLO for non-HPE drives, but this does not prevent normal operation in most cases. If you require full iLO health monitoring integration, HPE-branded SmartDrive options provide tighter firmware integration.
Does the DL160 G10 support hot-plug drive replacement?
Yes, in its standard SFF drive bay configuration the DL160 G10 supports hot-plug replacement, meaning you can swap the failed drive without powering down the server. Confirm your specific configuration supports hot-plug before attempting this.
How long does a RAID rebuild take on the DL160 G10?
Rebuild time depends on drive capacity, RAID level, and server workload. For a 1TB SAS drive, expect 1 to 3 hours under normal load. Larger drives (4TB or more) can take 6 to 12 hours. During the rebuild, server performance may be slightly reduced.
My DL160 G10 is out of warranty. How do I get replacement parts?
Independent hardware resellers and third-party maintenance providers carry replacement drives and components for the DL160 G10 at discounted rates. This is often the most cost-effective path for servers running past their HPE warranty period.
What RAID levels does the DL160 G10 support?
With the HPE Smart Array controller installed, the DL160 G10 supports RAID 0, 1, 5, 6, 10, 50, and 60. The embedded S100i controller supports RAID 0, 1, 5, and 10. Always confirm your controller type before planning your storage configuration.
Running Aging HPE Hardware Past Warranty? ReluTech provides third-party maintenance for HPE ProLiant servers, including the DL160 Gen10. Save 40 to 70% compared to OEM rates with flexible support contracts.
